Manual WordPress Migration, Step by Step
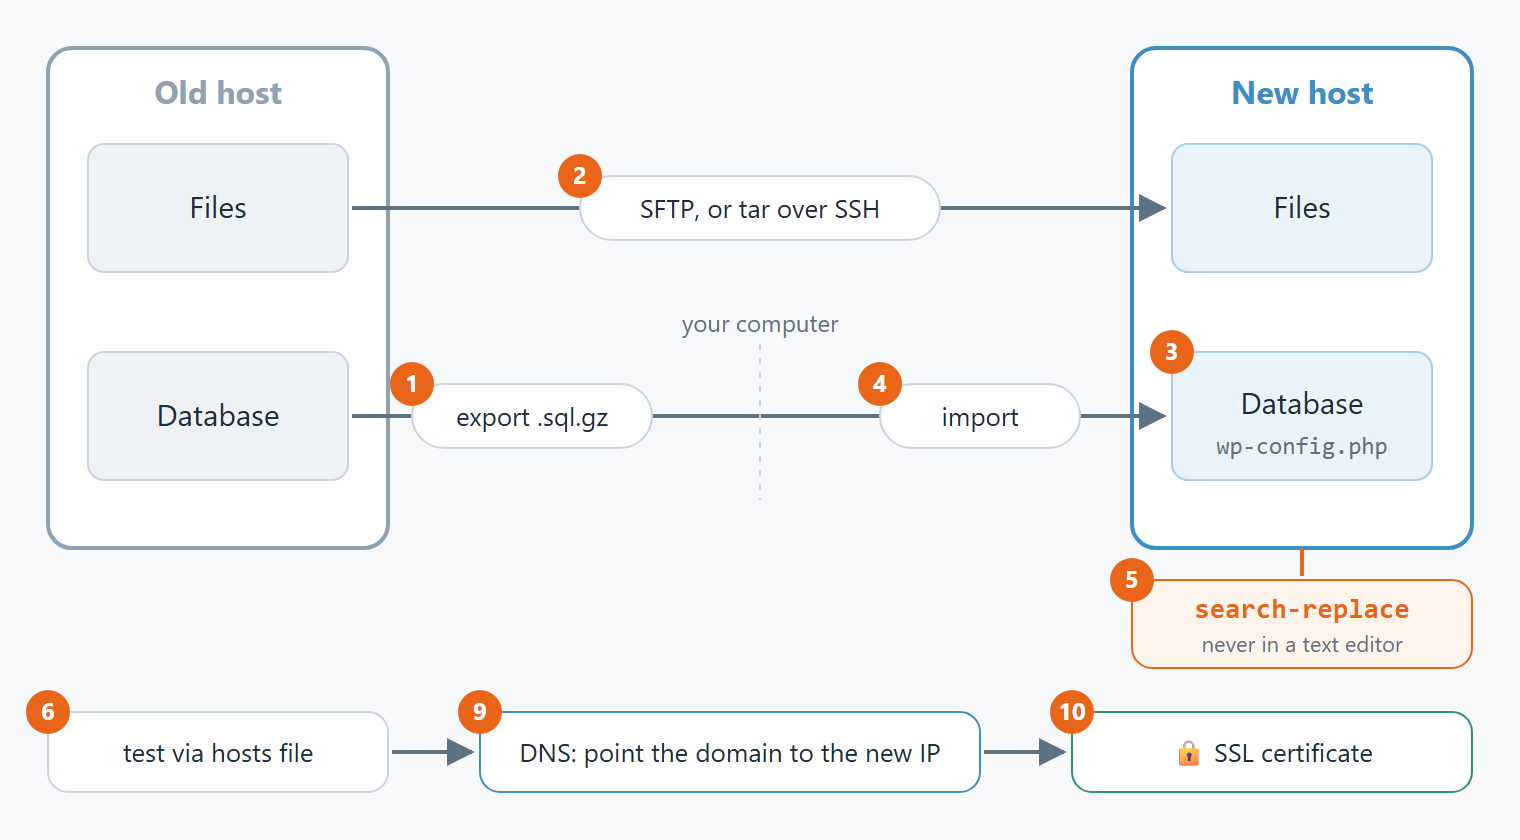
This WordPress migration guide moves a site from one host to another by hand. Files go over SFTP, the database through phpMyAdmin or WP-CLI, and DNS comes last. Every step has two versions. The first works with nothing more than a control panel and an SFTP client. The second is for readers who have SSH and want the job done in a few commands.
I first wrote this in 2015 on my old blog. Some advice from that version did not age well. One tip in it could even break a site without any warning, so this is a rewrite rather than a repost.
When a manual WordPress migration makes sense
Migration plugins such as Duplicator, All-in-One WP Migration and Migrate Guru work well for most small sites. If one of them does the job for you, use it. Doing it by hand pays off when a site outgrows the plugin’s free tier or the new host’s upload limit. It also helps when a plugin migration has already failed and you need to see which step broke.
It also teaches you what a WordPress migration actually is. Every plugin does the same steps below, only out of sight.
Before you start
- SFTP access to both hosts, and phpMyAdmin or SSH on both. Plain FTP sends your password in clear text, so use SFTP wherever the host offers it.
- An SFTP client. FileZilla is fine; download it from the official site only. For SSH, Windows 10 and 11 already ship with OpenSSH, so
sshworks from any terminal without PuTTY. - The site added as a domain or account on the new host. You also need an empty database, a database user and its password. If you are not sure how, ask the new host’s support.
- The PHP version of the old site. In wp-admin it is under Tools > Site Health > Info > Server. Set the new host to the same version or a newer one that your theme and plugins support.
- A lower DNS TTL. A day before the move, set the TTL of the domain’s A record to 300 seconds. The switch in step 9 then spreads within minutes instead of hours.
Plan a content freeze as well. Comments, orders and form entries that reach the old site after the export never make it to the new one. For a blog that means a quiet hour. For a WooCommerce shop it means maintenance mode.
1. Export the database from the old host
Without SSH, open phpMyAdmin and select the site’s database. Click Export, keep the Quick method and the SQL format, and click Go. If the database is large, choose the Custom method and set compression to gzip. phpMyAdmin imports .sql.gz files directly, and the compressed file is often a tenth of the size.
With SSH, go to the WordPress directory and let WP-CLI read the credentials from wp-config.php for you:
cd ~/public_html
wp db export ~/site.sql
gzip ~/site.sql
Keep this file even after the migration succeeds. It is your backup of the old site.
While you are in the database, note the table prefix. The tables are named something like wp_options and wp_posts, and the part before options is the prefix. You will need it in step 3.
2. Copy the files
Without SSH, connect to the old host with FileZilla and download the whole WordPress directory. First turn on Server > Force showing hidden files. Otherwise .htaccess stays behind, and with it your redirects and any custom rules. Then connect to the new host and upload everything into the site’s directory. Press F5 if new files do not appear in the listing.
Thousands of small files transfer slowly over SFTP. With a File Manager in cPanel or Plesk on both hosts, you can pack the directory into one archive. Move that single file and extract it on the new host.
With SSH, you can stream the files from one server to the other through your own computer. No archive lands on either disk, and the two servers never need access to each other:
ssh user@old-host "tar czf - -C ~/public_html ." | ssh user@new-host "tar xzf - -C ~/public_html"Copy the full installation, core files included, rather than a fresh WordPress download plus wp-content. Both approaches work. The full copy has one less place for a version mismatch to hide.
3. Edit wp-config.php on the new host
Open wp-config.php in the new site’s directory and fill in the database you created on the new host:
define( 'DB_NAME', 'new_database_name' );
define( 'DB_USER', 'new_database_user' );
define( 'DB_PASSWORD', 'new_database_password' );
define( 'DB_HOST', 'localhost' );
Check DB_HOST with the new host instead of assuming localhost. Managed hosting and cloud databases often use a separate hostname. A wrong value gives you “Error establishing a database connection” and nothing else.
Further down the file, confirm that $table_prefix matches the prefix you noted in step 1. If it does not, WordPress finds no tables with that prefix and offers to install itself from scratch. Also look for absolute paths the old host needed, for example in WP_CONTENT_DIR or a cache plugin’s constant. Change them to the new server’s paths.
With SSH, WP-CLI edits the file for you:
wp config set DB_NAME new_database_name
wp config set DB_USER new_database_user
wp config set DB_PASSWORD 'new_database_password'
wp config set DB_HOST localhost
4. Import the database
Without SSH, open phpMyAdmin on the new host and select the empty database. Click Import, choose the file from step 1 and click Go. If phpMyAdmin rejects it as too large, compress it with gzip first. If it is still over the limit, ask the host’s support to import it for you. Most will do it within the hour.
With SSH, upload the file and import it from the WordPress directory. WP-CLI takes the credentials from the wp-config.php you just edited, which is why step 3 comes first:
cd ~/public_html
gunzip ~/site.sql.gz
wp db import ~/site.sql
One error comes up often when the old host runs MySQL 8 and the new one runs MariaDB: Unknown collation: 'utf8mb4_0900_ai_ci'. MariaDB does not know that collation. Open the .sql file in a text editor, replace every utf8mb4_0900_ai_ci with utf8mb4_unicode_ci, and import again. This replacement is safe, because it touches table definitions and not your content.
5. Replace the old domain and paths
Skip this step if the domain stays the same and nothing in the database points to the old server’s directories. Otherwise, this is the step where most manual WordPress migrations go wrong.
The 2015 version of this guide told you to open the SQL file in Notepad++ and replace the domain there. Do not do that. WordPress and its plugins store widgets, theme options and plugin settings as serialized PHP. In that format the length of every string is written next to it, for example s:22:"http://old-domain.com/". Change the domain to one of a different length and the stored length no longer matches. WordPress cannot read the value and silently drops it, so widgets, menus and theme settings disappear with no error message.
With SSH, WP-CLI understands serialized data. Run it with --dry-run first, which only reports how many replacements it would make:
wp search-replace 'https://old-domain.com' 'https://new-domain.com' --all-tables --skip-columns=guid --dry-run
wp search-replace 'https://old-domain.com' 'https://new-domain.com' --all-tables --skip-columns=guid
The same command fixes old server paths, such as /home2/olduser/public_html replaced with the new site’s directory. Some plugins store those for caches, logs and uploads. After a move they point to a directory that no longer exists.
Without SSH, use Search-Replace-DB by interconnect/it. Upload its folder to the site’s root under a random name that nobody will guess. Open it in the browser, run a dry run, then the real replacement. Delete the folder right after. Left on the server, it gives anyone who finds it full write access to your database.
6. Test the new site before DNS changes
The domain still points to the old host, but your own computer can be told otherwise. Add a line to your hosts file with the new server’s IP address:
203.0.113.10 example.com www.example.comOn Windows the file is C:\Windows\System32\drivers\etc\hosts and needs an editor started as administrator. On macOS and Linux it is /etc/hosts. Restart the browser and click through the site: the home page, a few posts, the contact form and the wp-admin login. The new host probably has no SSL certificate for the domain yet, so expect a certificate warning at this stage. Everything else should work.
Remove the line when you are done. Otherwise you will never notice if DNS itself is wrong, because your computer keeps going straight to the new server.
7. Fix file permissions
Files copied from another server sometimes arrive with the wrong permissions. WordPress expects 755 for directories and 644 for files. With SSH, run this in the WordPress directory:
find . -type d -exec chmod 755 {} +
find . -type f -exec chmod 644 {} +
chmod 640 wp-config.php
The + at the end passes many files to one chmod call. That is much faster than one call per file. wp-config.php holds the database password, so it gets tighter permissions. If the site shows a white page after the last command, PHP runs under a different group on that host. Try 600, or ask support which value they recommend.
Without SSH, FileZilla can do the same. Right click the WordPress directory, choose File permissions, enter 755, tick Recurse into subdirectories and select Apply to directories only. Repeat with 644 and Apply to files only.
8. Flush permalinks and caches
In wp-admin, open Settings > Permalinks and click Save Changes without changing anything. This rebuilds the rewrite rules and fixes most “404 on every page except the home page” problems after a move. Then clear the cache of any caching plugin and of the CDN, if you use one.
wp rewrite flush
wp cache flush
9. Switch DNS
At your DNS provider, point the A record of the domain and of www to the new server’s IP. Do the same for the AAAA record if you have one. Leave the MX records alone unless your email is moving as well. It is easy to break email with a migration that was only meant to move a website.
With the TTL lowered a day earlier, most visitors reach the new server within minutes. Some resolvers ignore TTL, so keep the old hosting account running for at least a week.
10. Issue the SSL certificate
Let’s Encrypt checks that the domain points to the server asking for the certificate. This step therefore waits until DNS has switched. Most control panels issue it with one click, often automatically. If the site then shows a padlock with a warning, some content still loads over http://. Run the search-replace from step 5 again, from http://example.com to https://example.com.
If the browser shows “Your connection is not private” after the switch, my guide on fixing that SSL error walks through the usual causes.
11. Check the error log
Every host is configured a little differently. A plugin that ran quietly on the old server may complain on the new one. The host’s PHP error log is usually in the control panel. For WordPress’s own log, add these lines to wp-config.php for a day or two:
define( 'WP_DEBUG', true );
define( 'WP_DEBUG_LOG', true );
define( 'WP_DEBUG_DISPLAY', false );
Errors then go to wp-content/debug.log without showing on the page. Set WP_DEBUG back to false when you are done. On many servers the log file is readable from the web. If you cannot make sense of an error, send it to the new host’s support. That is part of what you pay them for.
After the move
Keep the old hosting and the database dump for at least a week. Watch the error log and check that contact forms still send email. Also open the site from a phone on mobile data, which uses a different DNS resolver than your home network. Cancel the old account only when a week has passed without surprises.
What about letting an AI agent do it?
I tried. For this rewrite I wrote a prompt for a coding agent with shell access. I ran it with Claude Code against two throwaway WordPress servers in Docker. The agent did the first half well. It took an inventory of both hosts and noticed the non-default table prefix. After a backup of the database and the files, it streamed the files across. It filled in wp-config.php without ever printing a password, and it stopped for approval where the prompt told it to.
Then it reached the database import. Claude Code’s own safety layer refused to run it, even after I had approved the step. Overwriting a database on a remote server is exactly what these tools leave to a person. I think that is the right call. It does mean the riskiest step of the whole migration stays with you. An agent can save you time on the preparation and on checking the result afterwards. Plan to run steps 4 and 5 yourself.
If this still feels like too much, hiring someone to do it is a perfectly reasonable choice. A broken migration usually costs more than a paid one.